skip to main |
skip to sidebar
This is a Glog that I created, which gives a brief representation of our music video through words and images. It represents ideas that we had and implemented in our music video. This mood board was created on an online software called Glogster EDU.

I have had a Glogster account for a while now as this was one of the technology's that I used for my AS portfolio, and so was familiar with the set up of the software. Glogster edu allows you to set up a simple account which is free, however you can upgrade to a premium account paying a monthly fee. I used the free version which allows you to import images, videos and music to create a mood board which they call a 'Glog'. It is a very simple product to use and is quick to use if you already have the images saved. Another great benefit is that similar to other online programs I have used, you are able to embed your final product on to your blog. which makes it look that bit more professional!
We made story board so that when we were out of set filming the music video we had something to look back at and were able to make the video as good as possible due the amount of planning.
We used one post-it notes for each different shot that we would take. The meant that we would easily be able to visualise what we would need to do at each different stage of the filming. Using Post-it notes meant that if we decided to change the order it which we were to have the scenes then we would be able to move them much easier than if we used storyboard paper like we did in year 12.
We took great care when drawing the scenes on the post-it notes so that when we changed the storyboard into an animatic to show to the actors they would have an even better idea as to what we wanted them to do as oppose to if the drawings lacked detail and we just spoke the instructions to them.
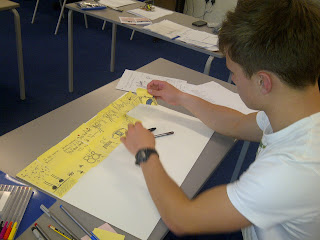 All of the drawings were originally done in pencil and then colour and outlining with a black pen was added after. This was so that if we made any mistakes with the drawings we could amend them much easier than we would be able to if we drew them in pen straight away. The pen made the drawings easier to see on the animatic as they were bold and colourful.
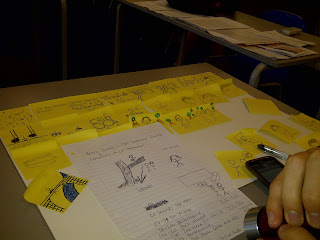 The storyboard to a number of weeks to perfect and we both feel that this was time well spent as without a brilliant storyboard it is impossible for anyone to create a brilliant end product. Here Jonny and myself are discussing the order in which we want the post-it notes to be. There were a lot of scenes that we weren't sure of the order and once we had put them in different orders on the animatic we were able to decide upon the perfect order for all of the scenes in order for us to make what we hope will be a really good music video.
Here we are comparing our original planning notes to the storyboard that we are in the process of creating. We wanted to make sure that we gave our self some guidance to how we would make the storyboard so that we didn't begin to come up with stupid ideas that seemed good at the time but once it came to filming them were impossible to actually pull of
I created a detailed timeline of the footage that we will use in our music video as part of our planning. I chose to do this as I believe it will be extremely beneficial in the long run with both filming the footage and the editing of the music video. This timeline allows us to know exactly what footage we need and where it will go in relation to the other footage. I also have the timeline on a word document so that it is easier to consult when we are out filming.

I originally created this timeline on a power point presentation but then converted that to an online presentation using an online application called 'slideshare'. This was the first time that I had used 'slideshare' and so I was asked to create an account- this was fairly simple! However once I had created the account there were no instructions on how to use the application. I struggled at first on how to use the application, but I soon figured it out by simply uploading my power point at the click of a button. The application then processed the power point turned it in to an online presentation and gave me an embedding link. The program was very simple to use and is a clever idea for anyone who wants to share a presentation document online!
We planned our Synopsis on a online brainstorm and mind map creator called bubbl.us. We started by splitting the music video in to 4 sections: 1st,2nd and 3rd verse and the chorus. We then followed these up with the locations, characters, the lyrics to that section and a brief synopsis of what would happen. This allowed us to create the mind map above.
 This was the first time that I used this program and I found it relatively easy to use! There was a small introduction to the program when I singed up which talked me through the basics, this was useful. There were also buttons which worked as short cuts which made things much quicker, for example ctrl+enter added another branch to the mind map. This mind map program was really effective in organizing all of our thoughts on our music video synopsis and displaying it in a format that is simple to follow. I will definitely be using this program again!
We found this video on Youtube about the diferent styles of music video and found it really useful in helping us to choose the right music video genre for the Village Musicians. The video was posted by videomaker which is a group of film producers which post videos to help people create their own films and music videos.
After watching the video we then proceeded to view the village musicians promotional video which helped give us a greater insight in to the band and how they present themselves as a group (this was an important factor in helping us to decide what style of music video we would use.) From watching the promo video we have decided to rule out dance genre as we feel that this does not fit in with the image of our band. We also felt that although browser looked really effective, our capabilitys could not stretch to this use of music video genre. Watching this video helped us understand that performance in our music video was really important for promoting our up and coming band. Close ups of the band members playing their music will help promote their image to our target audience and will increase public awareness of our band. We have also chosen to include a story (narrative) in our music video as the examples given of 'Daughtry- Its Not Over' showed us that we could add emphasis to the lyrics of our song through effective narration. With in our narration, we would also like to experiment with animation. At the moment, we think that 10 or so seconds of stop motion could add effect to the music video. Although this is not always the norm in a music video, we would love to challenge ourselves by showing a wide range of film production techniques. We also feel that the stop motion will draw greater attention from the audience in the first 10-15 seconds of the music video.
Using You Tube as a means of determining the genre of our music video has been simple and very effective and has also allowed us to use ANOTHER form of technology as part of our Research Evidence.


